Friday, January 29, 2010

edible exploits: cranberry crumb bars

In an attempt to try and use up some of the produce I've been hoarding in my itty-bitty freezer, I came upon some beautiful cranberries I'd stowed away back in October. One of the great perks of living in New England - other than being able to enjoy the vibrant autumn leaves, of course - is access to fresh, local cranberries that grow in bogs right in our "backyard" and all around the surrounding towns.


These particular cranberries came from a friend of my father's, who owns several local bogs. My Dad was kind enough to share his berry bounty with me, and they have been patiently waiting in my freezer (where they can stay for up to a year), for the perfect recipe to come along.

These cranberries were extra special to me and as such, deserved to be savored in a really great recipe. But which one? Cranberry sauce? Bor-ring! Not to mention, so predictable. Cranberry bread? Yawn. Cranberry cookies? Meh. Nothing seemed to inspire me enough to want to use my precious rouge beauties.

When I came across Tiina's cranberry crumb bars, I was intrigued. And now that I've made them, I know I held out for the right recipe. Sweet, tart and crumbly, these bars are like a fruit crumble to go. Great with a cup of tea, or perhaps as a juicy midnight snack (not that I would know *ahem*), these crumb bars are a major win. And they're Dad-approved :-)


Cranberry Crumb Bars

{Recipe from Sparkling Ink, November 2009}

Prep Time: about 20 minutes
Total Time: about an hour
Makes: ~18 bars

Ingredients:

For dough-

  • 3 cups flour
  • 1 cup sugar
  • 1 teaspoon baking powder
  • 1 cup (2 sticks) butter, chilled
  • 1 egg

For berry layer-

  • 3 cups cranberries, fresh or frozen
  • 1/2 cup sugar
  • 2 tablespoons corn starch

::If you're using local berries like I am -even if they're right out of the freezer- make sure to give them a good rinse, and pick over them for leaves, twigs and damaged berries. Other berries or fruit also work with this recipe so, if cranberries are out of reach, use whats available to you.::

1. In a large bowl, combine the flour, sugar and baking powder. Cut the chilled butter into cubes and work it into the dry ingredients until crumbly. Add in the egg, and mix until combined. Divide the mixture in half, and press one half into a deep greased baking dish. [Tiina recommends a 9x13" but, I used a 10x10" which also worked worked well and produced a thicker bar.] Set the rest of the dough mixture aside.

2. In another large bowl, toss the cranberries with the sugar and corn starch. Spread the berry mixture evenly over the pressed-in dough (and sprinkle any remaining sugar/corn starch evenly over the berries). Crumble the second half of dough mixture over the berry layer.

3. Bake at 375 degrees for about 45 minutes, or until the top is golden brown. To prevent the top from browning too much and to ensure the bottom layer bakes properly, move the dish from the middle level to the lowest level in the oven after 30 minutes of baking. Cool completely before cutting into bars. Store covered in the refrigerator.

Now I'm off to New York City for a long weekend of eating, drinking and merriment -- I hope yours is equally fun! See you next week. x

Wednesday, January 27, 2010

scrap paper fun: part one

I've been itching to do something creative lately but, I wanted to use up the materials leftover from other crafting endeavors before I go spending more money at Michael's. So, I decided that some scrap paper projects were in order.

Inspired by Martha's scrap paper notebooks and by this recent grocery planner project over at Design*Sponge, I tried to find uses for some scrapbooking papers that I bought for an album last year that never materialized.

First, I gave my beat-up RS planner a fun tree print lining to bring it back to life, and then I covered a plain clipboard with a cute strawberry print to use as my own grocery/meal planner. (Maybe it will inspire me to add some more fruit to my shopping list? I hope so!)

I also needed a notebook for BYW class but, didn't really have the money to buy a nice hardcover one . So what's a crafty-but-cash-strapped girl to do? Make one! (Or three!)

My mom loved my DIY notebook so much, she requested one for herself-- for grocery lists, messages and such. I made her two mini notebooks with some cool purple hydrangea paper (below) while I was at it.


The only materials I used: various papers, spray adhesive/glue, scissors, a hole punch and some jute twine (all of which I had around the house). All of these little projects were super simple and not at all time consuming -- the total time it took me to complete all of them was less than an hour (plus a little drying time). A piece of cake with a big visual impact. Funny how lovely prints cheer up the most mundane things, huh?

I'm already looking around my office for more things I can cover in pretty prints, and seeking out other fun scrap paper projects... leave me a comment with any links, projects or ideas!

And stay tuned for Part Two ;)

x

Monday, January 25, 2010

cheese please


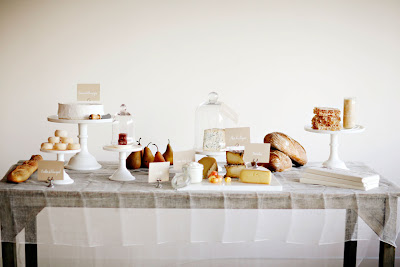
Recently over at the fabulous Sunday Suppers, they gave us a peek at the dessert cheese table they created for their feature on Martha's wedding blog, detailed in several posts. I thought the whole idea was brilliant and beautifully presented -- I had to share.

As Casey mentions, "it is very attainable for every bride—DIY brides to high end wedding planner events can mold this idea to fit their budget" and I just love the versatility in this project. The DIY possibilities for a buffet like this are endless.

Its all just so rustic and chic. The divine cheeses... the beautiful fresh fruits... the crusty baguettes... the golden honey... the gorgeous cake stands and cloches... I'm in love.

They even shared their tips for selecting cheese for your own spread, plus how-tos for the honey fromage blanc and granola party favors. So go have a look! x

{all photos by Karen Mordechai for Sunday Suppers}

Friday, January 22, 2010

edible exploits: pineapple with tequila & mint

Hello there friends. Its *Friday* ya-hoo! Some days I felt like it would never come!

Well, I've continued with my resolution to try new recipes every week to expand my culinary horizons, and I'm pretty proud of that. I'm told that many people have given up on their resolutions by now, and for once I'm not one of them.

I was looking around for some snack and dessert recipes that are on the healthy side because I'm also attempting to eat better this year. So, I thought maybe having a delicious fruit dessert recipe would be handy for those days you just need something sweet but, don't want to resort to something too sinful.

I came upon this super simple recipe in Perfect Mexican -- a little gem of a cookbook, with lots of fresh, wonderful recipes and vivid, enticing photos. Sweet, succulent pineapple combines with fresh mint and just a touch of smokey-smooth tequila for a treat that is sure to satisfy your sweet tooth (without all that sugar, of course).


Pineapple with Tequila & Mint


{Recipe from Perfect Mexican, Parragon Publishing 2006}

Prep Time: about 10 minutes
Serves: 4-6

Ingredients:
  • 1 ripe pineapple

  • sugar, to taste
  • juice of 1 lemon
  • 2-3 tablespoons tequila (or a few drops of vanilla extract if you prefer)

  • several sprigs of fresh mint, leaves removed & cut into thin strips
  • fresh mint sprig, to garnish (optional)
::What to look for in a ripe pineapple: the flesh should be firm, somewhat golden in color and it should have a sweet aroma. Steer clear of fruits that are completely green, don't smell sweet, have brown leaves or are bronze/red in color.::


1. Using a sharp serrated knife, cut off the top and the bottom of the pineapple. Place upright on a cutting board, then slice off the skin, cutting downward. Cut the pineapple in half, remove the core, then cut the flesh into bite-sized chunks.

2. Place the pineapple chunks in a bowl and sprinkle with the sugar (only a pinch is needed as ripe pineapple is already quite sweet), lemon juice, and tequila or vanilla extract. Toss to coat well, then cover and chill until ready to serve.

3. To serve, arrange on a plate and sprinkle with the mint strips. Garnish with a fresh mint sprig if desired.

I would recommend using a good quality blanco (white) or plata (silver) tequila for this dish, as the smokey-ness does not overwhelm -- I like Don Julio or Herradura for their smoothness. As a general rule of thumb: if you wouldn't drink it straight, don't put it in your food!

Thanks for stopping by and have a great weekend! x

Wednesday, January 20, 2010

food for thought

I just discovered Brooklyn-based illustrator Claudia Pearson yesterday via decor8, and I have completely fallen in love with her 2010 seasonal produce calendars! I still haven't gotten a pretty new calendar for this year (yes, I'm a slacker) but, I think I've found the one for me.

These lovelies encourage you to buy local, with beautiful illustrations showcasing the produce in season during the months -- helping you change up your fruit & veggie intake, get the freshest ingredients available and perhaps keep you on track with those resolutions to eat better. Cute and practical. Love!

She makes three different versions - 6x9" printed, tea towel and poster - all available in her sweet shop. Check out her blog for recipes that coincide with her featured produce, too!

Monday, January 18, 2010

monday blues


The past week has been a stressful and busy one for me, friends. In spite of this, I'm trying to stay positive. This too shall pass, right?

I had to share this inspirational print by Eva Juliet because it reminded me that happiness is a choice. And I'm choosing joy (en francais, of course. Because everything is better in French.)

Here's to a great week. x

Thursday, January 14, 2010

offbeat bride feature: photo lantern tutorial

Hello! Back again to let ya'll know that I am completely honored to have my very own DIY photo lantern tutorial featured on the Offbeat Bride!
{Its been quite a week for me, here in Internetland! :-) }


If you are a bride-to-be in need of an easy centerpiece idea, or someone looking for a fun craft that is customizable to any event or holiday, its definitely worth a look.

Many thanks to Ariel and Shrie for showcasing my MacGyver-like craftiness!

Wednesday, January 13, 2010

stick me!

Have you seen these amazing Stick Me! collaborative sticker books put together by graphic designer Yael Frankel? Not only do they feature her own adorable designs but, the works of other artists and designers from across the Flickr community, and they're just fantastic! Little pieces of art that you can use to brighten up your office accouterments, day planner, electronic gadgets, mood board or anything else they'll stick to.

I just bought myself the Stick Me Valentines (above), which include stickers from some of my favorite Etsy artists, like Laura Berger and Geninne Zlatkis. I have big plans for these little cuties!

You can check out all the awesome Stick Me books, collaborative coloring books, prints, rub-on decals and lots more cute stuff in Yael's shop. Enjoy darlings!

Tuesday, January 12, 2010

cc love!


I love Creature Comforts -- I mean, what's not to love? Loads of beautiful inspiration every day, amazing featured shops and lots of fun DIY projects/free printables. Love love love.

Well, I've got another reason to love it! I e-mailed Ez and asked for her oh-so-fashionable advice on an outfit I need for my upcoming NYC trip.... and she put together an outfit for moi in her latest Chic for Cheap! Yay :-)

So go take a peek and check out the rest of her lovely site! (Thanks again Ez!)

Monday, January 11, 2010

edible exploits: chocolate almond pastries

Hello dears! I hope your weekend was as productive as mine. I cleaned and organized and got some fresh air outdoors, and I felt like it was time well spent. How about you?

One of my goals for 2010 is to try a new recipe each weekend -- be it a dessert, a meal, a cocktail or any combination thereof. And wouldn't you know it: I followed through! I actually tried two recipes out this past weekend but, this one was by far my favorite.

Whether you pair it with your morning tea/coffee for breakfast, or with a scoop of vanilla ice cream for dessert, this pastry is quick, easy and darn delicious.


Chocolate-Almond Pastries


{Recipe from Martha Stewart Living, December 2009}

Prep Time: 5 minutes
Total Time: 40 minutes
Serves: 4

Ingredients:
  • 1 sheet frozen puff pastry (from a 17.3oz package), thawed
  • 1 large egg lightly beaten, for egg wash

  • sanding sugar*

  • 1 1/2 ounces semisweet chocolate, coarsely chopped
  • good quality honey
  • sea salt

  • 2 tablespoons whole almonds, toasted & coarsely chopped

1. Preheat oven to 450 degrees. Arrange puff pastry on a parchment-lined baking sheet. You should have about a 10-inch square of pastry (trim edges if needed). Fold in each edge to form a 1-inch crust. Prick the middle of the dough all over with a fork. Brush edges with the egg wash, and sprinkle with sanding sugar. Freeze for 15 minutes.

2. Transfer baking sheet to the oven, and bake for 15-20 minutes or until pastry is puffed and golden brown. Remove from the oven, and cover center evenly with chocolate. Drizzle with honey and sprinkle with salt. Return to the oven, and bake until the chocolate melts (about 2-3 minutes). Sprinkle with chopped almonds and cut into 4 squares. Drizzle with more honey if desired.

*I couldn't find sanding sugar so I just used plain ol' granulated sugar; it worked fine but, didn't have the same crunch as sanding sugar.


I really enjoyed eating a piece of this pastry for breakfast. Some might say its too early for chocolate (crazy, I know!) but with the honey and the almonds, it was just right. Days that start with pastry are always good in my book :)

Enjoy & have a great week!

-Mrs M.
{images: me}

Thursday, January 7, 2010

a fresh start

Hello there! I hope you all had fun ringing in the new year. Can you believe its 2010?

Instead of making big resolutions, I was inspired to make mini goals for myself (in hopes that I will actually accomplish them!).


I want to get my yoga back on....

{lotus pose & OM prints to inspire me}


...I want to eat well without depriving myself...


{a succulent fruit salad & cranberry-grapefruit sparklers for a healthy sweet}


...and finally decorate our apartment.

{inspired by nature & simple Scandinavian design}


What about you -- are you making any goals or resolutions for 2010?

As a side note, I'll be starting the Blogging Your Way e-course in less than two weeks, which I am thrilled to be a part of! Needless to say, there will be some changes around here as a result and I am really looking forward to see what comes of it.

Until next time!

xxx,
Mrs. M